Monday, January 20, 2020

Take the High Ground

“Take the high ground”. These were Captain Scarlett’s latest orders in the ongoing campaign to repel the Teutonians from Albionia’s green and pleasant land. The Teutonians had recently captured and occupied a prominent hill next to a main road that ran in the direction of the enemy invasion. If the hill could be taken, then it would be easier to thwart and advance.  Company A was going to be fully committed with the HQ and all three rifle platoons. In addition, battalion and brigade had loaned a mortar and a heavy machine gun (HMG) section respectively.


Meanwhile...

Franz and Willi shivered in their foxholes staring down the valley. Their platoon along with another were dug in and concealed.  Reinforcements were supposed to be on the way, but nevertheless, Willi made some stupid comment about “vanting to be home in der Farzerland”. Franz cussed him out. “Don’t you know zat ven ever anyvon says dat, der Albionian pig-dogs attack?” He would have felt better if he had known that a mile or so behind, Kapitan Schwartz, along with another remaining platoon, a HMG section and an infantry gun were on their way. The enemy must not be allowed to seize the hill. And just to help out further a battery of cannons were available for support.

For this battle I decided to go back to ‘Up the Blue’. The scenario is the fourth in OHW and I have been reading up on tactics to better understand potential strategies for both sides. I decided that Scarlett would probably use a gambit move with one the platoons, with two behind in a triangle formation. The rest of the force would be in reserve until contact was made, possibly working around the hill.  Meanwhile, Schwartz’s men on the hill would stay hidden until they saw the whites of the enemy’s eyes. The reinforcements would attempt to use their firepower to prevent the hill garrison being overwhelmed.

Turns One and Two
The Albionians fanned out as the Teutonians on the hill stayed put. Schwartz appeared on the horizon, but so far there was no action.


Turn Three
Schwartz won the initiative and let fly with the infantry gun at the Scarlett’s 3rd platoon with two hits. Great start. His HQ platoon, complete with an artillery forward observer (FO) moves towards the woods along with the HMG section. But not so close as to be in line of sight (LOS) of the Albionian HMG.

Scarlett’s entire company boldly advanced on the hill. 2nd platoon switched to ‘tactical’ moves, but since they could still no see the enemy they could not fire unless the Teutonians did. Meanwhile, 1st platoon attempted to sneak around the hill. The mortars opened fire on the infantry gun but only inflicted one point of damage.

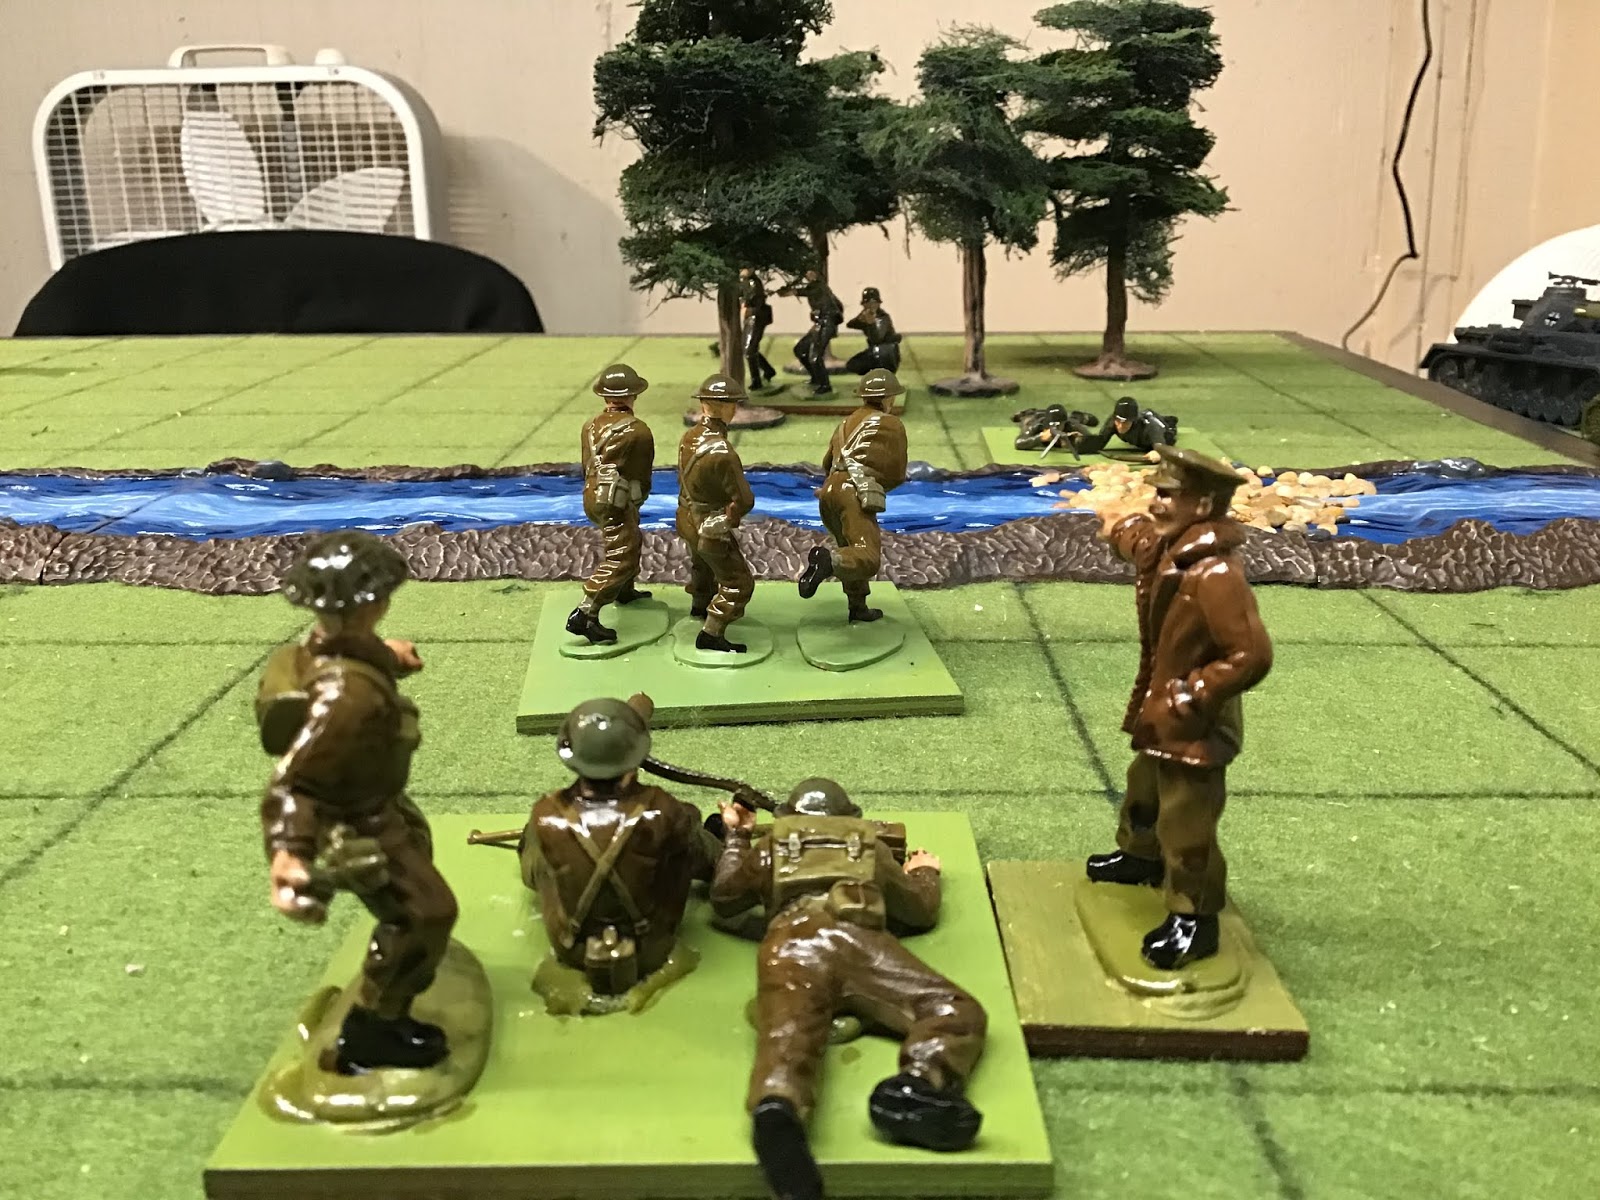
Albionian’s A Company prepares its assault

Turn Four
Scarlett had the initiative this time. It was time to finally attack the hill. 1st platoon advanced and were fired on by the Teutonians (3, 5, 6, 6 + 1,  3, 4, 6 = 5 hits). Since this was in the same volley from two separate units I counted this as one attack and therefore the unit received a permanent hit (a higher level of severity, this limits a units ability to rally to full strength and its combat ability). 2nd platoon reacted weakly with one dice (3 - 1 vs dug in -1 for the permanant hit) and scored no hits on the enemy. But, at least Scarlett knew where the enemy was now! 1st and 3rd platoons moved forward but could still not see past the crest in order to attack.

Schwartz ordered his FO to contact the Medium Battery to the rear to fire on the nearest large enemy unit, 3rd platoon. They roll 4 dice (1, 2, 4, 5 for 2 hits). The rules say that the number off attack dice goes down by the number missed the next time it fires.  Schwartz then ordered the gun to fire smoke on the enemy HMG whilst his HMG ran into the woods.

2nd Platoon’s foolhardy assault

Turn Five
Things were not going right for Scarlett. Schwartz won the toss and the chaps on the hill blazed away at poor old 2nd platoon (3, 3, 4, 6 = 2 hits; 1, 2, 5, 5 = 2 hits). 2nd platoon dissolved and fell back in full disorder towards the field latrines. The FO ordered in another salvo, only 2 dice but a 2+ would be a hit for firing on the same target (4 and 6 = 2 hits). 3rd platoon were not happy. The infantry gun joined in (two 4s) platoon ran after 2nd platoon!

Scarlett was hopping mad!

Scarlett was now hopping mad. As fugitives ran past him he focussed the remaining platoon to work around the western side of the hill as the mortar and HMG engaged what they could. The HMG fired on Schwartz and his platoon inflicting just one hit, but the mortar added another two. It was time to get under cover. Meanwhile 1st platoon swung around and attacked the western most foxholes on the hill. Albionians had 3 dice - 1 for fighting against dug in troops but another 1 for being in ‘touch’ and since they were fighting against the rear of the enemy they needed only a 3+ to hit. Conversely, even though the Teutonians had four dice, they needed a 5+ to hit back. Albionians (3, 6, 6 = 3 hits), Teutonians (4, 6, 6, 6!!!). Even honours.

Turn Six
The gods of war favoured Kapitan Schwartz as yet again he won the initiative. The beleaguered Teutonian platoon on the hill returned fire on 1st platoon (1, 2, 2, 6 = 1 hit). The FO ordered artillery on to the enemy HMG (5, 6 = 2 hits). The gun turned its attention to 1st platoon and inflicted a hit on them. Schwartz finally decided that he needed his main efforts on the western side of the battlefield.

What could Scarlett do? 1st platoon were reluctantly pulled back in the hope they could be rallied. The heavy weapons units however were presented with a juicy target as Schwartz moved his reinforcements across the road (HMG 3, 4, 6 = 2 hits, mortar 5, 6 = 2 hits!). Once again, Schwartz had a whole unit dissolve around him. The odds were now even.

1st Platoon assaults the hill

Turn Seven
Or at least they would have been if Schwartz didn’t have the luck of the devil. A new FO link was set up with a platoon on the hill. The Teutonians fired at the Albionians trying to fall back (2 hits) and 1st platoon melted away. Finally, the infantry gun lobbed a shell at the Albionian HMG (5, 6 = 2 hits).

The infantry gun swings into action

This was the point that Scarlett stared in disbelief at the mess that the attack had become. He had an intact infantry platoon and mortar section, but the HMG section had taken a lot of damage. With the enemy still firmly ensconsed on the other side of the hill crest it would take a miracle. The HMG section rolled a Quality Test and won a hit point back. The mortar sent off a round towards the infantry gun and scored 1 hit.

Turn Eight
Schwartz once again won the initiative. The FO called down the medium artillery, this time on Scarlett and the HQ platoon (2, 6 = 1 hit). The artillery only had ten more rounds at this point. Meanwhile the infantry gun inflicted two hits on the poor HMG section, only one more hit and they would be gone too!

Courageously (foolishly?) Scarlett led the HQ platoon forward. The mortar section laid on smoke. This was going to be a do or die mission.

Scarlett’s HQ platoon advance

Turn Nine
No luck Scarlett. Initially, the Teutonian FO called down fire on the Albionian HMG who finally disappeared.  The dug in Teutonians fired on Scarlett as he urged his men forward. Despite the smoke, damage was inflicted (4, 5 = 2 hits). The infantry gun added to Albionia’s woes by attacking their mortar section (5, 6 = 2 hits).

With a mighty cheer, HQ platoon assaulted the hill (1, 3, 3 = 0 hits!). At least the mortar was able to score one on the other Teutonian unit on the hill (I had decided that the Teutonians were getting all the breaks here and allowed the mortar one dice despite them being technically behind the crest of the hill).

Turn Ten.
Finally Scarlett won the initiative. This time the HQ platoon rolled high (4, 4 and 6 = 3 hits). The mortar failed to work any magic this time.  Then. The Teutonian medium battery fired once again and the remaining Albionian heavy weapons were sent packing. The battle against Scarlett however was less effective (2, 2, 2, 6 = 1 hit). The other platoon however seized the moment and swung round into the flank of Scarlett and the gallant HQ platoon (2, 3, 4, 6 = 2 more hits).

Turn Eleven
Scarlett called for one more effort but it’s was futile (1, 2 and 2). Before he knew it, a guttural voice in his ear said “for you the var ist over”. Scarlett was in the bag!

What went wrong for the attackers? If anything why did everything go right for the defence? Constant futile frontal assaults obviously. Here I was role playing the situation of not knowing what was on the other side of the hill. On balance, the Albionian’s should have tried to envelop the hill under smoke cover, even though there was little room for maneuver on either side of the hill. The Teutonians were ruled to be dug in behind the slope and therefore were in a very strong position and the support of artillery ensured that the defense would be practically invulnerable. Add the fiendish luck of Schwartz in winning nearly initiative and it was inevitable that Scarlett would lose.

What about Scarlett? I think a daring escape attempt is in the offing.


Saturday, January 11, 2020

Control the River


Captain Scarlett had just been assigned another mission. The Teutonian advance had a least been slowed down in this sector and Brigade were working on a counter attack but it involved capturing two vital river crossings. Not only this, but he had to keep the enemy from using them either.  An anti-tank troop was to accompany him in order to consolidate the position. His old company was now back up to strength and both a mortar and machine gun section were going with them.

Kapitan Schwartz was intent on the coming action. Ever since the last engagement he could think of nothing other than striking back at the Albionians. The first two serious battles of the campaign had resulted in the almost complete loss of his unit. The invasion was briefly halted and a counter attack was imminent. Aerial reconnaissance had seen a build-up of troops near a river. Schwartz was now on his way to take control of a likely set of river crossings that the enemy might use.

In the first two engagements, I used a variant of One Hour Wargames called ‘Up the Blue’. I will almost certainly use these again in the future but wanted to take another old set out for a spin, Bob Cordery’s Portable Wargame. These rules are an almost direct descendant of Joseph Morschauser’s 1960s modern rules which some readers will know about. Changes were made to the grid. These would now use a 4” square. Also, PW includes a card based system to decide how many units can move. Finally, instead of an option using hit points, I would use the more ruthless ‘instant death’ option where units could be removed at a stroke. I apologize if I assume too much knowledge of the rules, but I know many readers already have copies. I hope others will enjoy the narrative. Once again, I am using the OHW scenarios, this time number three, Control the River.

Forces
Teutonian:  Kapitan Schwartz (6 points), 3 infantry units (12 points), 1 mortar unit (2 points), 1 machine gun unit (2 points), 1 tank unit (3 points) = Total 25 Points. Exhaustion level 3.

Albionians: Captain Scarlett (6 points), 3 infantry units (12 points), 1 mortar unit (2 points), 1 machine gun unit (2 points), 1 anti tank gun unit (2 points) = Total 24 Points. Exhaustion level 3.

A note on exhaustion points. Instead of a fixed number of turns, the battle continues until both units have lost half their number of units.

Turn One
Both sides were advancing from the northern and southern side of the river trying to beat each other to the crossings. This could be a violent and bloody encounter. A two of diamonds started the battle by giving Scarlett the ability to activate two units. One platoon was despatched to make a swift advance on either crossing.

The Albionians creep onto the field

Turn Two
A four of spades however meant that our friend Schwartz was able to launch even more men in the direction of the river. The tank unit made its way over the open ground on the west side with infantry support, whilst an infantry unit with a machine gun section skirted the woods to the east.

The Teutonians advance boldly

Turn Three
A two of spades. Schwartz had a difficult choice. He could urge the vanguard on or wait for the rest of his force to catch up. In the distance, the enemy appeared weak. Could he gamble on things staying that way? The lead tank commander decided the issues yelling “tanks forward”. The lead vehicle waded into the shallow water with the infantry following closely behind. This was a good start. Hopefully nothing bad would happen as the tanks could not fire as they crossed the ford.

The Teutonians armour splashes towards the enemy

Turn Four
A Joker forced a reshuffle and the next card was a two of hearts. Scarlett immediately heard that an enemy tank troop were advancing across the river. The anti-tank section were immediately despatched to the hill overlooking the river. In the meantime, the infantry would have to try and hold the enemy up as best they could. 1st platoon worked their way close to the ford and engaged with their anti-tank weapons. Albionians roll a 4, Teutonians roll a 1-1 for being the ford. Fortunately, the Albionians were nothing but a mischief, but nevertheless problematic.

Only to be held up...

Turn Five
A three of hearts meant that now Scarlett could engage the Teutonian armour with his AT gun and allow the infantry to withdraw. A roll of 1 however pathetically missed. The infantry might as well have stayed.  Meanwhile 2nd platoon advanced closer to the other ford.

Turn Six
A four of diamonds. The anti-tank guns once more tried to drive back the enemy tanks (1 + 1 for firing at the same target) but with no effect. 1st platoon was sent back to the river bank (D6 of 2 v D6 of 3-1) however failed to dislodge the Teutonians from their bridgehead. At this point, 3rd platoon and the mortar section arrived ready to support either of the other two platoons.

Turn Seven
A two of clubs. Finally. The tanks and 3rd platoon (for such they were) made an effort to force their way across. 3rd platoon set up positions to fire on the opposite bank (D6 of 2, why bother?). The Teutonians attacked (D6 of 3-1 vs D6 of 5!). The hapless Teutonians were soon balling out of their vehicles unde a hail of anti-tank rockets and bullets. At least one tank drove into the deeper water where it stayed for the next seventy years until it reappeared on a YouTube video.

And go into ignominy...

Turn Eight
A two of diamonds. Scarletts 1st platoon dashed along the bank to engage the Teutonians opposite (roll a 6 and a 2 for effect) the enemy infantry dispersed under the heavy fire. Scarlett took this opportunity to bring up the machine gun section with himself.

Captain Scarlett looks important

Turn Nine
A four of spades. A furious Schwartz urged his men on both at the eastern ford and where his tanks wallowed. The machine guns dashed through the dense woods and set up facing the ford and put the enemy guarding the southern side under fire (3D6 5, 5, 1 with two 1s for effect), who were either cut down or dispersed. 1st platoon then sharply moved towards the ford. Meanwhile Schwartz personally led 2nd platoon and the mortar section to repair the damage at the western ford.

Schwartz makes a last effort


Turn Ten
A three of spades. The Teutonian machine guns and 1st platoon moved down to the banks of the river. This was risky as the Albionian machine gun section was on the other side. However, first platoon were able to drive them back (D6 of 5 and 4 for effect) with Scarlett chasing after them. Meanwhile, Schwartz sent his mortars up to bombard the Albionians opposite (D6 of 6 then a 4) which forced them to retreat.

Turn Eleven
A four of hearts. Scarlett immediately began rallying his force against this sudden spirit of aggression by the enemy. To begin with, he ordered his own mortars forward to fire back (D6 of 1 no effect). 1st platoon pulled themselves together and returned and using long range effective fire. The Teutonian mortar crews hastily retreated but in the confusion lost much of their equipment and were no longer effective. Meanwhile, Scarlett urged his machine gun section into action and they soon had their tormentors in their sights (3D6 6, 6, 1 followed by a four and six) forced the Teutonian infantry back into the woods. 3rd platoon leapfrogged and sniped against the Teutonian machine guns who were in the open but with no effect (D6 of 3).


Turn Twelve
A three of clubs. The Teutonian machine guns pulled back to the woods alongside their 1st platoon who were skulking amidst the Larches. They defiantly brought the enemy under fire but with no effect.

Turn Thirteen
Three of diamonds. The plucky lads of 1st platoon splashed into the ford. The mortar team set up behind them and gave covering fire (D6 of 1...yay). 2nd platoon shuffled towards the East ford.

1st platoon cross the ford


Turn Fourteen
Two of spades. Schwartz and his men were not going to give up without some resistance. Deadly fire directed personally by Schwartz cut down most of the men of 1st platoon as they tried to climb the northern bank of the river. The machine guns in the wood also fired at the bank opposite with little noticeable effect (they rolled a 1).

Schwartz’s last stand. I think not.


Turn Fifteen
A joker reshuffled the pack and the last card drawn was the two of diamonds. The Albionian mortar section laid down deadly accurate fire on Schwartz and his men (D6 of 3, D6 of 3 for effect equaled destroyed). But once again, Schwartz was able to escape. The failing light meant that further action had to stop. But it was clear that the Albionians had control of the river crossings.

The remaining Teutonians hide in the woods


Unlike the other two battles, there was no dramatic crescendo or last stand. The card system ensured that whatever action was taken would be uncertain, wondering if the next card would allow that side to bring up enough units to make the push over the river. Under PW, can only move out of the river ford on their next turn and can’t fire. Therefore, crossing was a deadly business here. In this game, units were destroyed in the fords because they could not retreat. I wonder what others think Schwartz should have done?

I would like this moment to thank Bob Cordery of Wargaming Miscellany for his encouragement down the years and of course The Portable Wargame which you should buy along with all his other books.

Sunday, January 5, 2020

Pitched Battle (2)

“Kapitan Schwartz”, Oberst Blink’s voice was an odd half snarl, half whine.  “I have a job for you now that you have reconstituted your company and made up your losses”. Blink continued, “I want you to take your company, seize a vital crossroads south of here”. Blink gestured vaguely to a map. “You will notice a prominent hill to the north west of the crossroads, you must occupy this too for our artillery spotters, I am sending you with the mortar section and we have a tank troop. We have reports that the enemy have armour in the area, that is all.”

Five miles to the south or so...

“Scarlett”, said the Colonel, “Brigade have instructed us to protect a vital crossroads directly to the north of our position. Obviously the enemy would be at an advantage if they controlled it. Brigade also tasked us with the other objective of denying high ground, to the north west of the crossroads called Mended Hill. Brigade feel this will be too tempting for their artillery spotters to ignore”.

“One last thing” said the Colonel “you managed to lose almost you entire command in the last operation. In fact, the only men who came back were the mortar sections. I am giving you B company, while A company is being brought back up to strength. Their commander went sick yesterday. In addition, a tank troop are being attached to you...try to bring most of them back this time Scarlett”.

Aerial photo of the actual battle

As I said in my previous post, I am attempting to play solo, every scenario from Niel Thomas’s One Hour Wargames using Alex H’s ‘Up the Blue’ adaptation of the OHW rules. As can be seen, I use 54mm models with a very stylized gridded battlefield. The whole playing area represents an area of around a square mile. Only the most important features are actually represented, but if you imagine it, the ground is dotted with trees and hedges along with dips and gullies that individual soldiers would be able to use for cover. The scenario was covered in the dramatic introduction and so I will launch straight in with the battle report!

Turn One
Both sides have to seize and hold vital points on the ‘country’. Mended Hill and the crossroads (I was going to use a cheap gag about it having a motel but only older British readers would understand it and are probably grateful I didn’t use it). The road and open ground would obviously be occupied by mobile units and the hill would be a devil to take. In Schwartz’s shoes I decided to hold the hill with half the infantry available and send the rest of the force to seize the crossroads. Scarlett has the low ground but has the advantage in mortar support. The mortars are set up to provide fire support across the line, while two platoons will advance on the hill. The tank and other platoon will be left too hold the crossroads.

The Teutonians won the toss moved first. Their 3rd and 4th platoons took the hill. Next turn they would dig in just behind the crest and get ready. 1st platoon advanced 450 yards to the east of the road, the tanks moved ahead and 2nd platoon made slightly slower progress behind them. The Albionians advanced steadily with all the infantry and tanks reaching the east-west road. So far, so good.

Vital ground is seized and occupied

Turn Two
Albionians started this turn. The crossroads group immediately dug-in, indicated by polystyrene project bricks. I had to check the rules at this point. Could tanks ‘dig in’? I know tank commanders will find any useful terrain to protect and partially conceal their vehicles (hull-down) but how did Alex’s rules address this? Tanks could not dig in, but they can go hull down on the crest of a hill or where the terrain is classed as rolling. It wasn’t so the tanks sort of sat there. Could the tank radio to the mortars that they had spotted the enemy tanks. I looked for a specific rule and decided that units would have to roll a quality test (QT) to see if they could. They needed a 3 and rolled 1. Stupid messenger pigeon.

The Teutonians could not see the dug-in infantry but their tanks could see the Albionian tanks. They opted to fire at 300 yards and cover the infantry advance (1, 2, 6 = 1 hit). 2nd Platoon got within 150 yards of the Albionian infantry positions and since the Albionians were not able to dig in AND get ready, the Teutonians could fire unopposed (1, 4 = 1 hit). Could they radio for the mortar to add its support? A roll of five said yes and a whole 1 dice rained death on the Albionians (3 = 1 hit).

The fight builds up at the crossroads.

Turn Three
The Albionians won initiative. Their 1st and 2nd platoons pushed ahead with their advance on the hill. Scarlett could have brought 2nd platoon round to help 1st but orders, counter order equals disorder. I determined that by now the mortars would have the idea that they had to earn their pay. They opened fire on the nearest Teutonians, the 2nd platoon (1, 6/3, 5 = a total of 3 hits). 3rd platoon joined in (2, 4, 5 = 2 more hits). The Teutonains would have been fine but then the Albionian tanks decided to join in the fun (5, 5, 5 = 3 hits) and no more Teutonian 2nd platoon who scattered dragging their wounded with them.

First victory to Albionia. Schwartz’s 3rd and 4th platoons dug in on the hill. If they got the initiative next turn they could also get ‘ready’ allowing a hit back against an attacker. Schwartz himself moved closer to his men at the crossroads. His mortar sent a somewhat useless barrage against the Albionians 3rd platoon (2 = 0 hits). The Teutonians tanks continued to fire on the enemy vehicles (1, 1, 6 = 1 hit). 1st platoon meanwhile worked around the flank and made it to the road!

Turn Four
This time Schwartz won the initiative. 3rd and 4th platoons readied themselves for an attack. The mortar continued to fire (2 = 0 hits) but the Albionians built good fox holes. Even the tanks gunnery was lack luster (2, 2, 3 = 1 hit). However, using more boldness than sense, Schwartz moved 1st platoon to within yards of the flank and rear of the Albionian tank position using its anti-tank weapons (2, 4, 4, 6 = 3 hits) to great effect. Within minutes, the entire tank troop had been disabled and unable to continue to fight.

Schwartz’s daring ambush

Scarlett was alarmed. His infantry at the crossroads were now in danger of being surrounded. Quickly, he called in for mortar support (1, 6 = 1 hit, 2, 4 = 1 hit). 3rd platoon were only able to offer a desultory volley from their right flank section (1, 3, 3 = 0 hits). The question now, was whether to bring back 1st and 2nd platoons or at least halt them until the threat had passed. Discretion overcame boldness and the two platoons stayed in place.

Turn Five
The fright in turn four must have put ginger into Scarlett because he won the initiative. The only hope was to move his men out of their prepared positions and attack the flanking force with the mortars giving fire support (3, 5 = 2 hits and 3, 6 = 2 hits). This was not good! Since the Albionians were making a tactical move, the rules seem to allow them to fire (4, 5, 6 = 3 hits). Schwartz was fortunate to avoid being hurt, but the platoon were forced to retreat.

The Teutonian tank commander however was not done. Seeing the Khaki clad figures rise from their concealed positions, he immediately ordered high-explosive rounds (5, 5, 6 = 3 hits). Finally, the mortars had a target and added to the armour’s efforts (4, 4 = 2 hit). Now, the Albionians were filtering back bloodied and confused.

A great puckered hole in Scarlett’s center

Turn Five
Now Schwartz was in control. The tanks moved to seize the crossroads into such a position to see the nearest Albionian mortar position which was inexplicably unconcealed (forgot about that old chap). The mortars fired but missed (2, 3 = 0 hits). Should the troops on the hill advance? The two objectives had been captured, but according to the men on the hill there were at least two more enemy platoons out there.

Schwartz and his 'little tank'

Meanwhile Scarlett was in a fluster. The crossroads had been captured and he had no reserve. Reluctantly he pulled back 1st and 2nd platoons and told the mortars nearest to the crossroads to hang on. The mortars attacked the Teutonians at the crossroads (2, 5 = 1hits, 1, 4 = 0 hits) but did little damage.

Turn Six
A very confident Schwartz had his tanks turned towards the enemy. This was not an actual move, just a turn. And allowed the tanks to attack the approaching infantry advancing down the road (1, 2, 5 = 1 hit). The mortars as usual added little (2, 3). The men on the hill could harass the enemy infantry. 3rd platoon was ordered forward to flank the advancing infantry.

The enemy movement was spotted by 2nd platoon. The tanks at the crossroads were closer though, so only one of the mortar sections fired (1, 2 = 0 hits). Using what weapons they had, 2nd platoon was still able to score some damage on the Teutonians at the crossroads (4, 4, 6 = 1 hit). The mortars added to their discomfort (5, 5 = 2 hits).

Turn Seven
The Albionians won the initiative.  2nd platoon would have to edge towards the road. The mortars for once would do something useful and fire smoke. The rules specify that a unit can create a smoke cloud in one grid. The a roll against the quality of the unit is made (QT test) to determine how long the smoke cloud would stay. The mortar needs 4 or better on two dice (5, 6 = 2 turns). The other joins in (3, 6 = 1 turn). So now there is smoke cover for the infantry as they advance on the crossroad, with 1st platoon following.

The Teutonian tank now had a problem spotting for the mortars since the mortars weren’t close enough to fire directly. Let the dice decide. I rolled a QT (see above) with a -1 for the smoke (a 5-1 = 4 and success)...jammy. The mortars let fly (2, 6 = 1 hit). The tanks at the crossroads fired through the smoke hoping to hit something (- 1 dice for the smoke, so 2, 5 = 1 hit). 2nd platoon left the comfort of the hill and marched to the sound of firing.

Albionians advancing under smoke cover

Turn Eight
Once again the Albionians win the initiative. This gives the infantry the opportunity to close with the tanks parked at the crossroads. Stalking through the smoke they contact the tanks causing surprise so four dice needing 5s (3, 5, 6, 6 = 3 hits). Teutonian tank crews either surrender or race away from their burning tanks with Schwartz chasing after them. What a disaster!

The remaining Teutonians reassessed the situation. 2nd platoon dug in new positions. The new mission was to hold the hill! The mortar section shuffled closer behind them. Triumph had now turned to timidity. Meanwhile, Schwartz’s trusty driver found him and raced him to join with the remnants of his force. Schwartz is rescued (good job I got that kubelwagen off ebay).

Kapitan Schwartz makes his escape

Turn Nine and Ten
Scarlett now had the chance to redeem his earlier failures. He ordered 1st platoon to dig in, no more vain glorious charges. Meanwhile 2nd platoon would rally. The two sides were now some 600 yards apart. The Teutonian 4th platoon repositioned itself closer the 3rd platoon. Both units concealed themselves and got ready.

Turn Eleven
The Albionian 2nd platoon moved out from the crossroads while their mortar section moved up closer. Scarlett intended that least someone would occupy the crossroads and the mortars would it. The Teutonians could not see this and stayed put. I should like to find out more about scouting and pickets at the platoon/company level. Would there be any chance for the Albionians to stay completely undetected? I was metagaming at this moment and assumed the left hand section of Schwartz’s 3rd platoon were keeping watch.

Turn Twelve
The Albionians were being too lucky with intiative checks. 2nd platoon had moved into observable range but the Teutonians were under cover. Meanwhile, 1st platoon moved forward cautiously. The Teutonians whispered into their radios for mortar fire on the Albionians creeping in from the road (1, 3 = 1 hit).

Scarlett’s pincer movement

Turn Thirteen
This time the Teutonians won the toss and desperately threw caution to the wind. The mortars fired (3, 6 = 2 hits) at the intrusive Albionians. The rest of the force stayed low. Then tension was agonizing. Through the fire 2nd platoon advanced but cold still not identify the Teutonian positions. Meanwhile, 1st platoon advanced almost straight on top of them! The ready Teutonians let fly but their nervousness must have had an effect (4 dice scoring 3, 3, 3, 5 = only 1 hit!). The Albionians were luckier (1, 4, 6 = 2 hits). Since, 1st platoon were ‘touching’ the enemy, the mortars could not helpful for fear of hitting their own men.

A desperate moment

Turn Fourteen
The evening was getting closer. Schwartz was lucky this time. The mortars nothing this time despite firing at the same target (1, 1, 2 = 0 hits). Meanwhile at the foxholes, 3rd platoon put up a some resistance (2, 3, 5, 5 = 2 hits). Should 4th platoon be ordered up and help? Could they risk casualties and therefore control of the hill? They stayed put.

2nd platoon charged into the flank of the Teutonians who were now already fighting to their front (3, 5, 6 = 2 hits). Meanwhile, a gallant charge by 1st platoon forced the majority of the Teutonains to surrender (3 sixes = 3 hits). Once more Schwartz was able to get away. It was uncanny.

This is not going to look good on someone’s resume

Turn Fifteen
The sun was going down. The Albionians now made one last desperate push. Disregarding the enemy mortar crews, 2nd platoon advanced towards the hill into the waiting Teutonian 4th platoon. Every gun was brought to bear (1, 2, 2, 2 = 0 hits) but the fading light obviously must have had an effect. The Albionians fired (4, 5 = 2 hits). 1st platoon joined in by advancing up over the crest of the hill (1, 5, 6 = 2 hits). The remaining Teutonians kept up a determined resistance concentrating on the flanking force (1, 2, 4 = 1 hit).

The waning light reveals the last moments of the battle

This was clearly an Albionian win. They controlled the crossroads and by the end of the battle the ownership of the hill was still under debate. Another turn could see only an Albionian complete victory. No doubt there would be tense moments that night as soldiers dug foxholes within close range of their enemies. Would Schwartz be able to call up for reinforcements? Or would he once again disappear only to reappear to blight the Albionian’s lives? Who could tell?

Thursday, January 2, 2020

Pitched Battle (1)

OK, I finally decided to write a blog. Thanks to the constant prodding of friends I will now try to document my games. Hopefully it will also encourage me to play more too.  I play solo, with 54mm models, usually on a 3' x 3' gridded table. This will be familiar to fans of Wargaming Miscellany and of course 54 Or Fight. From the first I was put onto gridded games, and from the second pulled into the world of 54mm (although Tim Gow of Megablitz fame is mostly to blame with his Little Cold Wars). The small table comes from One Hour Wargames OHW) by Niel Thomas. So there are the influences on my current gaming, although like many others I have played with toy soldiers since I can remember, but that is another story.


So. I need a plan. Recently, the author of the Up the Blue Blog shared his latest version of his WW2 adaptation of the WW2 OHW rules (see above and keep up). I thought it might be nice to use his suggestions for using grids with his rules and play through the scenarios in the OHW book as a series of connected battles featuring my imaginations, Albionia and Teutonia.  These two countries have forgotten why they always tend to be at war. If there was to be a reason for their regular wars (about once every twenty years) they have long forgotten it. Lets just say that they need a good reason to distract their people from domestic issues with a splendid war, and that this time it was Teutonia's turn to invade Albionia.

The first battle on my list was the Pitched Battle (1). This battle was based on the 1544 dust-up between the Austrians and French at a place called Creosole.  This battle I am knowing from nothing except that the two sides had drawn up on two opposing hills across a valley and thought this was an excellent spot to kick the snot out of each other! How to turn this battle into a mid 20th century affair?  I decided that reinforced companies from both sides were searching each other out and had by chance met opposite each other in the fair valley of...Creosote.


The battlefield (according to Wikipedia entry on the Teutonian-Albionian war) was about a mile across dotted with fields, hedges, babbling brooks and the occasional potting shed (presumably used by wargamers which was a common past-time in both countries. The area was close enough for armies to bump into each other unawares but open enough that the only significant features were two large hills to the north and south.

Each force was made up of a company of three platoons, reinforced with support elements as they were available (won the auction on Ebay). So, using the random tables in the OHW book and allowing an absolute minimum of three infantry the two sides were as follows.


Captain Scarlett of the Albionian Rifles commanding A Company, with three platoons, 2 mortar sections and a WHOLE TANK troop.

Kapitan Schwartz of the 123rd Infantry Regiment commanding 1st Company with three platoons, an extra platoon drafted from another company, a mortar section and a small anti-tank battery.

Now. As a solo player one has a different approach to a more competitive social type of wargamer. I looked at the problem from one of likely military possibilities (like I would know one if I saw it). The scenario asked for as much bloodshed as possible with the highest bodycount winning the game. I also included the narrative idea of an invading and defending force seeking each other out and winding up in an encounter battle. It made sense for the support units of both sides to be held back while the footsloggers went out to find each other.

I assumed the role of the Teutonian set up and randomly chose the Albionian. An infantry platoon dug in on the hill supporting the mortars and anti-tank guns. Two platoons would march North East to South West, while another platoon would patrol the western part of the battlefield. I quickly made up a programmed plan for Scarlett. His infantry would probe ahead until they found the enemy, at which they would call up mortar support and if the tanks were handy they would advance to the contact point. A random selection, placed both of Scarlett's mortars on the hill, with two platoons to their immediate front and left, with the tanks another platoon to their right.

Turn One
All the infantry advanced across the valley, on the eastern side, contact was made at the range of 300 yards.


Turn Two
The Teutonians won the initiative and smartly called up mortar support. All units roll 3D6 with modifications and check against a target number to hit. The mortar section with 3 dice (-1 for indirect fire, +1 for troops in the flat and open) rolled and achieved 2 hits. A unit can take 7 before it is removed.  The Albionian 3rd platoon, for such they, were fired on the Teutons, they rolled 4 dice and needed 4s to hit if I recall (2, 5, 5, 5), ouch! Three hits. A mortar strike added another point to their woes. They had taken 4 hits and were now suppressed (its like being surprised and depressed at the same time). Hopefully their side would win the initiative next turn and be able to withdraw. Meanwhile the Albionian armour trundled up.

Turn Three
The Albionians won the toss. The remaining Teutonians were sent packing by 3rd platoon. Meanwhile, 2nd platoon had wandered into their opposite numbers and a quick firefight had resulted in 2nd platoon rolling 4 dice (1, 2, 5, 6) for 2 hits. The mortar sections rolled (1,5 and 2,4) for two separate hits. Soon, the Teutonians were down another platoon.  Do not caught in the open in these rules. Meanwhile the tank troop roared onwards and came face to face with the Teutonian redoubt.


Schwartz was not having any of this and spun his anti-tank guns round to deal with the threat.They rolled (3, 3, 5 and 6), all hits. Since there were four hits at once, one of those hits became permanent which in these rules degrades the fighting value of the unit. The Teuton mortar section desperately joined in, although not as effectively and only added another hit on the tanks. Meanwhile, the last badly battered Teutonian platoon pulled back.

Turn Four
Kapitan Schawartz could not believe his luck. The Teutonians won initiative and quickly rolled (2, 3, 4, 4), three hits and the Albionian tanks were punished for their careless charge. The western most Teutonian platoon swiftly dug in. The Albionians had now lost contact with the enemy so 1st and 2nd platoon advanced forward and contacted the Teutonians that had dug in. Meanwhile 3rd platoon rallied its troops.


Turn Five
Scarlett ordered his mortar sections to destroy the dug in Teutonians. They rolled poorly (1,1) and (1,3) inflicting only one hit. 1st platoon added another point of damage but the Teutons stayed in action. Meanwhile, 2nd platoon had arrived in a position where they could radio firing instructions to their mortars. Now it was the Teutonian's turn. The dug in Teutonians asked for support but the soldiers on the hill were more focussed on the infantry to their own front. Schwartz's men fired on 2nd platoon, but only four hits were scored despite the efforts of a platoon of infantry, the mortar section and the anti-tank guns joining in.

Turn Six
The Teutonians won the initiative and once more blazed away as well as they could. The Teutonians to the west of the hill rolled (1, 3, 5 and 6) now 1st platoon were down to four hits. The other platoon rolled (1, 2, 3 and 6) against 2nd platoon, they needed 4 to hit, aww come on! The Teutonian mortars added another point of damage before the anti-tank guns led personally by Kapitan Schwartz (who quite rightly had 'the dander up' by now). A deadly volley (3, 5, 5, 5) turned 2nd platoon into red mist (not really, it was more like the 1980s TV show, the A-Team where the baddies would just crawl out of their burning wreck of a car rubbing their heads).


Desperately, 1st platoon dug in and the battlefield was starting to look like it was going to turn into the last war with miles of trenches. But no fear. Once more the Albionian mortars pasted the dug-in Teutonians opposite. With rolls of (2, 6, 6) and (4, 5, 5) the Teutonians were no more a threat.

Turn Seven
The Teutonians now had two Albionian platoons to deal with, backed up by some fiendishly accurate mortars. They continued their hail of fire on 2nd platoon inflicting just four hits between all of them. 2nd platoon's luck was uncanny. Because they were now in line of sight of the Teutonian redoubt they called in mortar fire against the anti-tank gun. The mortars needed a 3+ to hit with 3 dice each they rolled (1, 3, 5), OK two hits then (1, 1, 1). I have only once seen this rolled before. Meanwhile 3rd platoon was in trouble, they had taken six hits so far and were looking for a place to rally or dig in.

Turn Eight
No such luck. Yet another Teutonian initiative win resulted in 3rd platoon's demise as the mortars scored (2, 2, 6). It was around this time, I thought the game had run its course. Both sides were in well protected positions. The Albionians still had a battered platoon which if they had any sense would have limped back to their start line. The Albionian 1st platoon tried to rally its men, but its heart really wasn't in it.

Turn Nine
But no! Albion won the toss, and 1st platoon once more worked their way forward from the relative safety of their foxholes in order for the mortars to do their magic again. The mortars fired on the last Teutonian platoon (2, 3, 4) and (2, 3, 4) for two hits each. Of course this was the worst move ever for the plucky men of 1st platoon as every Teutonian gun barrel swiveled their way with predictable results. Such was the devastation, that the anti-tank battery had time to rally a point.


Turn Ten
A lull ensued. Scarlett had no desire to advance from his strong position (and would have to explain the debacle is it was) and for the next three turns the Teutonians continued to lick their wounds and rally more troops, bringing their strength back up.

Turn Thirteen
Scarlett at least move his mortars so they could spot any advance. Schwartz reasoned that he might be able to get his now depleted force towards the enemy position in time, but to what end? Technically he had won by inflicting more casualties than his own force had taken. Sensibly both sides called it a day and a close Teutonian win. The stragglers, the survivors and the casualties were all collected up and put back in their toy box for another day.